Creating allocations in ManagePLUS Gold is mostly a simple, drag-and-drop process. It takes a few minutes to set up allocations the first time you do it. But the next time it won't take long at all, because you can re-use your allocation setups in subsequent accounting periods.
| See Re-using your allocation setups in the Miscellaneous Ideas & Tasks section. |
This section tells how to explore allocation information in the ManagePLUS Gold Classes window, and how to create or change allocations among classes.
|
Comment from Christine L. Manor, CPA: "Reading your paper may suggest to some people that all administrative costs can be allocated. That is true, with some caveats." "Truly common costs like rent should be allocated to all classes, program and supporting. Some supporting costs, like IT, may also need to be allocated to all the rest of the classes. Admin and Fundraising costs need to stay in their own classes for audited reports and the Form 990. Some organizations may want to allocate Admin and Fundraising to the rest of the classes for a “fully-loaded” picture of each class. This should be done “below the line.” A special Other Expense account should be used." "OMB A-122 (http://www.whitehouse.gov/omb/circulars_a122_2004/) is the guiding document for how recipients of federal awards (contracts and grants) must account for overhead expenses." |

| To assure that your allocation methods pass muster for audited reports and for Federal reporting (IRS Form 990), seek the advice of a qualified accounting professional before implementing them. |
| Carefully document your allocation methods so that you can defend the rationale on which they are based, to anyone who asks. ManagePLUS Gold helps with this, because it can preserve the details of allocation methods you used in each accounting period. |
About the Allocation Information columns
Both the Classes and Chart of Accounts windows have columns devoted to allocation-related details, the headings of which have a lavender background by default, as you can see in the screen shot below.
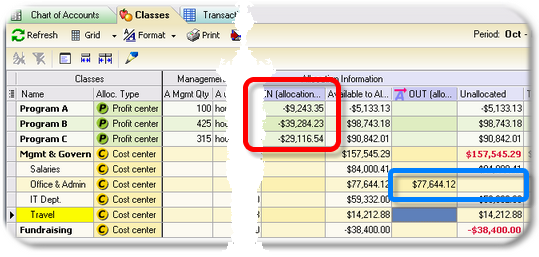
The purpose of these columns isn't as cryptic as it may at first appear. The learn the purpose of any column, just double-click any cell in it. That will display a dialog with details about how the cell's amount was calculated. For instance, double-clicking the cell indicated by the red box in the screen shot below will open the dialog shown beneath it.
| Besides double-clicking, you may also right-click on a cell and choose Edit / View cell details from a pop-up menu. |
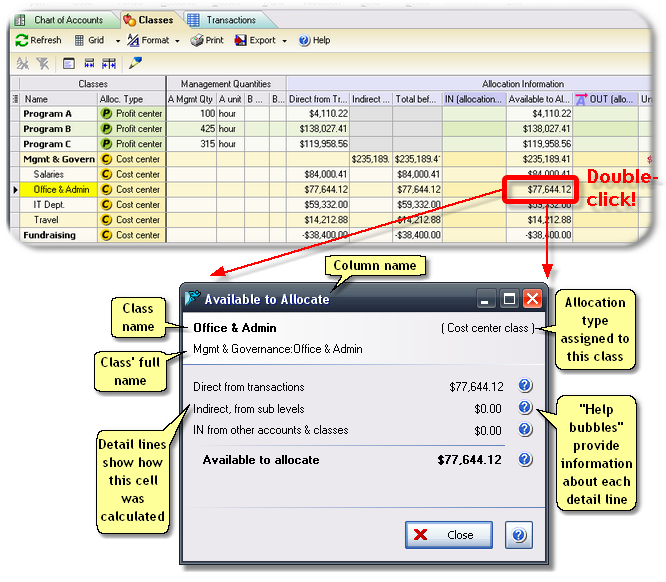
The dialog shown above explains the Available to Allocate cell on the Office & Admin class' row. It tells us that the entire amount available to allocate from Office & Admin comes directly from QuickBooks transactions (i.e., the Direct from transactions line). We can also see that Office & Admin has not received allocations from any other classes, because the IN from other accounts & classes line is zero.
The OUT (allocated to others) column is the most important one!
Double-clicking it opens the Allocated OUT (to others) dialog, which lets you create or edit allocations, as you will see later.
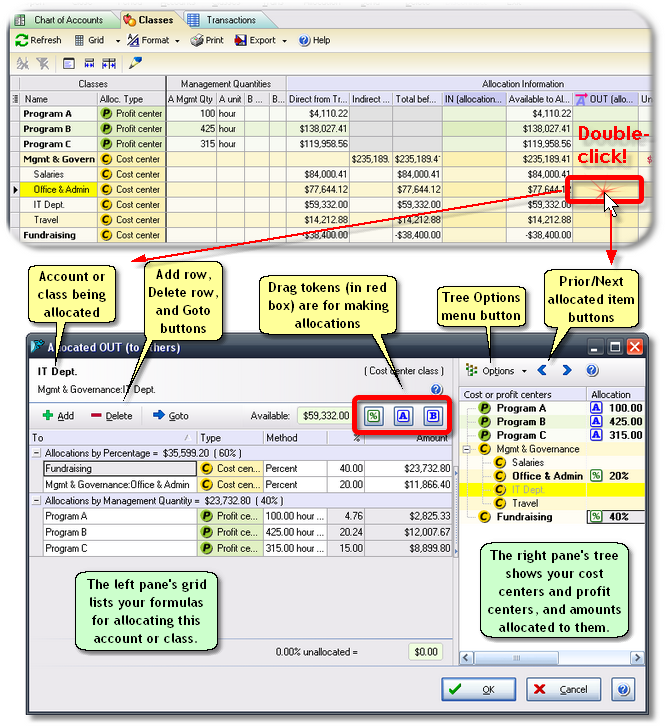
The examples which follow refer to many of the features of the Allocated OUT (to others) dialog, labeled above.
Example 1: Allocating Office & Admin expense, based on staff hours
| This allocation scenario is only an example, to show how to accomplish this type of allocation using ManagePLUS Gold. Consult Office of Management & Budget Circular A-122 (http://www.whitehouse.gov/omb/circulars_a122_2004/) or seek the advice of a qualified accounting professional before applying allocations. |
The number of staff hours devoted to each program seems to be a reasonable basis for allocating overhead expenses ("cost pool" classes) to the various program classes. Let's do that for Office & Admin expense:
| 1. | Double-click the OUT (allocated to others) cell for the Office & Admin class. |
This is illustrated by the example in the screen shot shown above, except there won't be any allocation lines in the left pane yet.
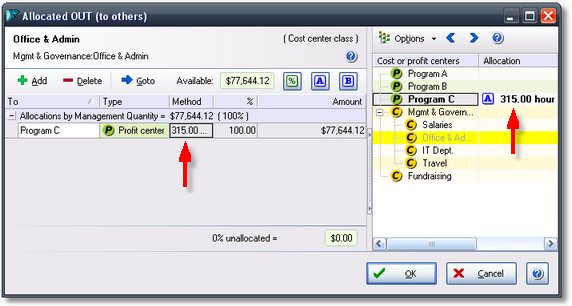
| 2. | Drag the [A] token into the right pane and drop it onto Program C. |
| Classes can have two management quantities associated with them—an "A" and a "B" quantity. Dragging the [A] token creates an allocation based on the "A" management quantity. (See Assigning management quantities in the First-Time Setup section.) |
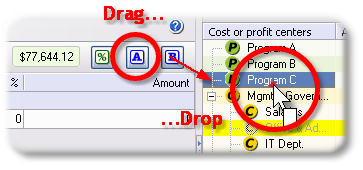
This creates an allocation from Office & Admin to the Program C class based on the management quantity we associated with Program C (315 hours):
| 3. | Drag the [A] token again, but drop it onto Program A this time |
| 4. | Finally, drag the [A] token and drop it onto Program B. |
When you're done, the dialog will appear as follows:
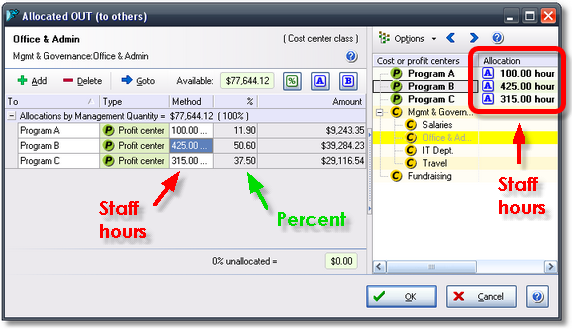
A couple things to note:
| • | All three allocations were made without typing anything. |
| • | The % and Amount columns were calculated automatically. |
| 5. | Click OK to close the dialog. |
After you do, notice that the three allocation amounts appear in the IN (allocations from others) cells of the program classes (the red box in the screen shot below). Also, the OUT (allocated to others) amount is $77,644.12 for Office & Admin, while the Unallocated cell is now blank (zero), as illustrated by the blue box in the screen shot.
Example 2: Allocating Travel expense, by percentages
| This allocation scenario is only an example, to show how to accomplish this type of allocation using ManagePLUS Gold. Allocating by fixed percentages may not be allowed for most expense types in NPOs. Consult Office of Management & Budget Circular A-122 (http://www.whitehouse.gov/omb/circulars_a122_2004/) or seek the advice of a qualified accounting professional before applying allocations. |
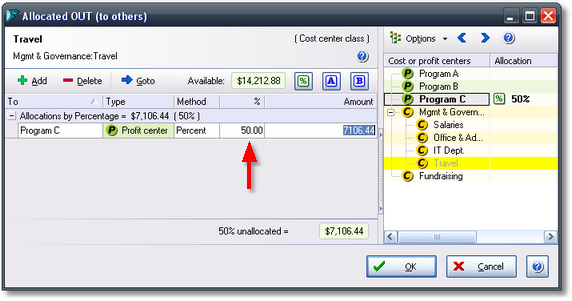
How should we allocate management's travel expenses? We could allocate them based on staff hours, but one of the managers has told us that more travel expense should be allocated to Program C—it's a relatively new program and they devoted a lot more travel to it, in getting it started. Staff hours aren't a good fit for doing this, so we can allocate by using percentages.
| If you are unfamiliar with using classes in NPOs, or with activity-based costing, the information in Christine's paper is nearly essential for understanding the ideas presented in this paper. So if you need some background information please read Christine Manor's paper before continuing. |
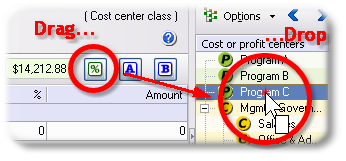
| 1. | Double-click the OUT (allocated to others) cell for the Travel class. |
The Allocated OUT (to others) dialog will open.
| 2. | Drag the [%] token into the right pane and drop it onto Program C. |
Management has told us to allocate 50% of travel expenses to Program C, so...
| 3. | Type 50 in the % column of the new allocation line, then press the Enter key. |
| 4. | Drag the [%] token again, and drop it onto Program A. |
| 5. | Type 20 in the % column of the new allocation line, then press Enter. |
| 6. | Finally, drag the [%] token once more and drop it onto Program B. |
ManagePLUS Gold keeps track of the remaining unallocated percentage and auto-fills the % column, so this time you don't have to type anything. Here's how the dialog should look:
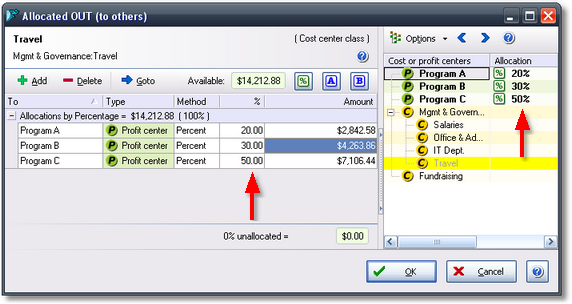
| 7. | Click OK to close the dialog. |
In the Classes window, notice that amounts in the IN (allocations from others) column have increased again for the three program classes—by the amounts of our just-now-added allocations. Let's have a look at one of them...
| 8. | Double-click the IN (allocations from others) cell for Program C, |
That will open the Allocated IN (from others) dialog, shown below. It lists the allocations Program C has received from Office & Admin and from Travel—the allocation we just now created, in the prior steps.
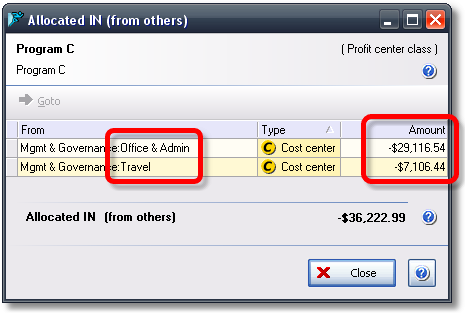
| 9. | Click Close to close the dialog. |
Example 3: Allocating IT Department expense, by percentages and staff hours
| This allocation scenario is only an example, to show how to accomplish this type of allocation using ManagePLUS Gold. Allocating by fixed percentages may not be allowed for most expense types in NPOs. Consult Office of Management & Budget Circular A-122 (http://www.whitehouse.gov/omb/circulars_a122_2004/) or seek the advice of a qualified accounting professional before applying allocations. |
Management believes it would be reasonable to allocate IT Department costs:
| • | 20% to Office & Admin |
| • | 40% to Fundraising |
| • | The remaining portion to program classes, based on staff hours. |
|
No, because ManagePLUS Gold works like a spreadsheet. If one formula depends on another, changing the first one automatically updates the second one.The IT Department expenses we allocate to Office & Admin here, will automatically flow through to the program classes which are targets of Office & Admin's allocations. In other words, allocations can "cascade" through any number of classes. |
Make the percentage allocations first
We make the percentage allocations first, so that whatever amount is left over can be allocated based on staff hours.
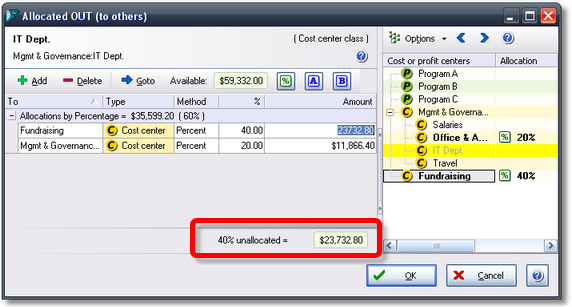
| 1. | Double-click the OUT (allocated to others) cell for the IT Dept. class. |
The Allocated OUT (to others) dialog will open.
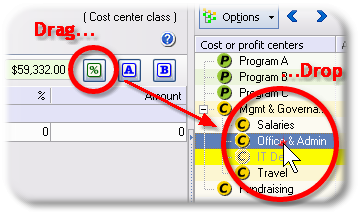
| 2. | Drag the [%] token into the right pane and drop it onto Office & Admin. |
|
It's quite common for support center or "cost center" activities to allocate expense to other cost centers or support centers. In fact, handling some allocations this way can make them more accurate. How? The manager of the IT Department may not have a good idea of what portion of his department's effort was devoted to each program—unless IT only worked directly with individual programs, which it doesn't. But he may have a good idea of what portion of the IT Department's time was spent supporting the main office staff (Office & Admin) and on fundraising activities. Using the best estimates provided by support activity managers, about how their department contributed to other activities (whether directly to programs, or to other support activities) should ultimately result in the most accurate allocation of expenses to programs. |
| 3. | Type 20 in the % column of the new allocation line, then press the Enter key. |
| 4. | Drag the [%] token again, and drop it onto Fundraising. |
| 5. | Type 40 in the % column of the new allocation line, then press Enter. |
The dialog should now look something like this. As the red box indicates, 40% of IT Dept. expense remains unallocated at this point.
Now, make the remaining allocations, based on staff hours
| 6. | Drag the [A] token into the right pane and drop it onto Program A. |
| 7. | Drag the [A] token again, and drop it onto Program B. |
| 8. | Finally, drag the [A] token and drop it onto Program C. |
When you're done, the dialog should appear as follows. Note that the upper part of the left pane shows the percentage-based allocations, and the lower part shows management quantity-based allocations.
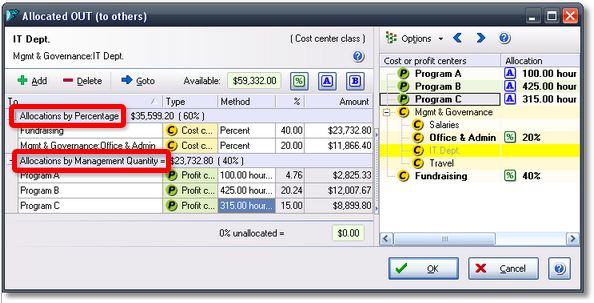
| 9. | Click OK to close the dialog. |
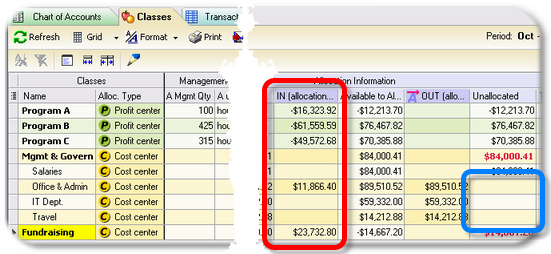
Here's how the Classes window should look now. The blue box shows that no Unallocated amounts remain for Office & Admin, IT Dept., or Travel (it's empty; meaning the cells are zero). The red box shows allocation amounts received by the various classes (expense amounts appear as positive numbers for "cost center" classes and as negative numbers for "profit center" classes).
There's a lot more we could explore, but these examples give you an idea of how quick and easy it is to make allocations with ManagePLUS Gold.