The mini-spreadsheet feature lets you do calculations access to multiple rows and columns of data on your QuickBooks forms.t
The Mini-Spreadsheet Idea
Mini-spreadsheets are just an extension of the anchor rows concept. They provide a way for formulas to refer to "prior" rows on the QuickBooks form:
•The Formulas row has a single anchor row above it, giving its formulas access to the immediately-prior row of data on a QuickBooks form.
•Item-triggered formula rows each have five anchor rows above them, giving them access to the five prior rows of data. (Blank rows are ignored and are not included in the count of data rows.)
Here is a screenshot of an Item-triggered formulas row on a Snapshot page, with its anchor rows section expanded. The red arrows indicate the vertical range of the Item-triggered formulas 2 row and its five anchor rows.
| See the anchor rows topic for details about showing/hiding anchor rows. |
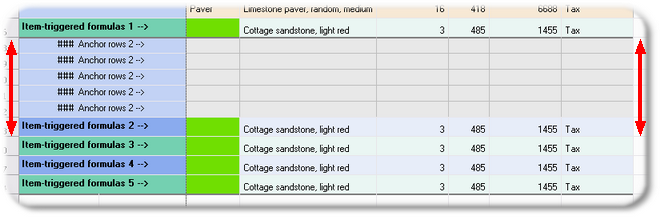
Think of this block of cells as representing up to six rows in the Detail section of a QuickBooks form. Formulas on the Item-triggered formulas 2 row can refer to any of its anchor row cells, and when a QuickBooks form is processed those formulas will actually refer to data fields of the five rows of QuickBooks data above the row where the trigger Item appears.
A Quick Mini-Spreadsheet Example
Here is an example to help you understand the relationship between anchor rows and QuickBooks form rows.
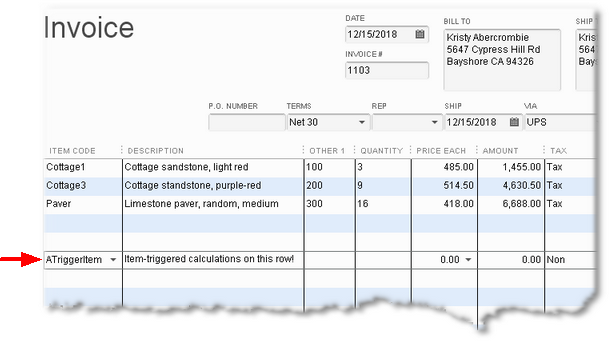
This screenshot shows a QuickBooks Invoice with several rows of data. The last row holds a trigger Item for an Item-triggered formula, indicated by a red arrow.
Below is a screenshot of an Item-triggered formulas row in FormCalc SST with two simple formulas, both of which refer to anchor row cells.
| The formulas aren't intended to solve a real-world problem, they just demonstrate how mini-spreadsheets work. |
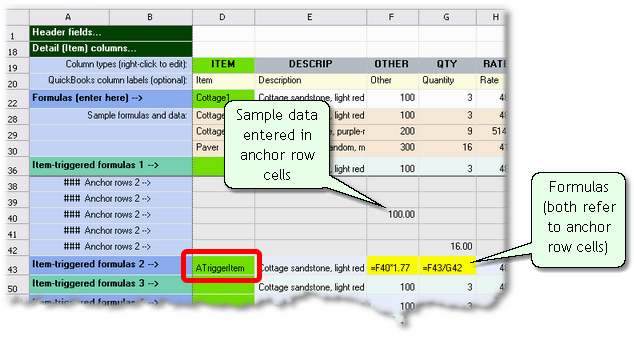
Things to note:
•The formula in the Other column multiplies a value from the third-prior anchor row by 1.77:
| =F40*1.77 |
•The formula in the Quantity column divides the result of the first formula by an amount from the 1st-prior anchor row (the fifth anchor row from the top).
| =F43/G42 |
•Sample data has been entered in anchor row cells targeted by the formulas, to allow seeing formula results immediately.
| You may enter sample data anywhere in anchor rows, and change or delete it whenever you wish. |
•The trigger Item name shown on the QuickBooks form, ATriggerItem, has been entered on the Item-triggered formulas 2 row.
Here's another screenshot of the same area, with calculated results showing in the formula cells.

When we process the QuickBooks Invoice shown earlier, this is the result:

Points to note about mini-spreadsheets:
1.Mini-spreadsheet formulas refer to QuickBooks form rows relative to the row where the trigger item is encountered on the form.
2.FormCalc SST ignores blank lines between data rows on your forms. Said differently, FormCalc SST operates as if QuickBooks forms have no blank lines at all.
| This can lead to some confusion until you get used to it. Like FormCalc SST, you must remember to ignore blank lines as you build mini-spreadsheet formulas! |
See also