This is a very complete and detailed description of steps involved in setting up and using FullSpeed macros to do calculations in other applications. You won't need all of these steps in most situations, but they are provided here to help you learn about the FullSpeed features and options you'll use most often.
| Target application is a term we use throughout this discussion; it means "the other program"—the application program where your FullSpeed macros will run. |
Open the target application and enter or retrieve some data—a completed invoice, for example. Then consider what you will need for the calculation you want to do. Think about:
| ® | What do I want to calculate--what basic formula(s) do I need? For instance, the volume of a cube is calculated as Length x Width x Height. |
| ® | Which pieces of data are already available in the target application? Maybe the Length is present but Width and Height are not. |
| ® | If I will need extra data for the calculation, where can I enter it (i.e., in which fields) or where will it come from? Maybe blank fields could be added to hold the Width and Height. Or maybe they could be filled in automatically by the target application. Some applications let you add fields or columns to their data layouts—a good way to make room for additional data. |
| ® | Where do I want FullSpeed to write calculated results (in which fields)? Where will the users of the results expect to see them? |
Let's set up a macro to calculate the total shipping weight on invoices in QuickBooks Online.
What about other applications?
If you use another application, like Xero, refer to the Problem Solved! section for your application. Total shipping weight examples are provided there for some applications. |
This will require:
| 1. | Getting an item weight and the quantity purchased, on each line of the invoice. |
| 2. | Multiplying the per-item weight by the quantity, to calculate an extended weight for each line. |
| 3. | Totaling the extended weights for all lines to get a total shipping weight for the invoice, and writing it on the last line of the invoice. |
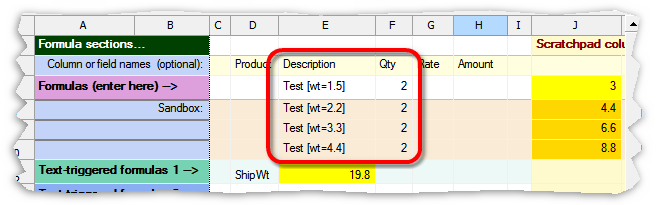
Here's a QuickBooks Online invoice, before the shipping weight calculation:
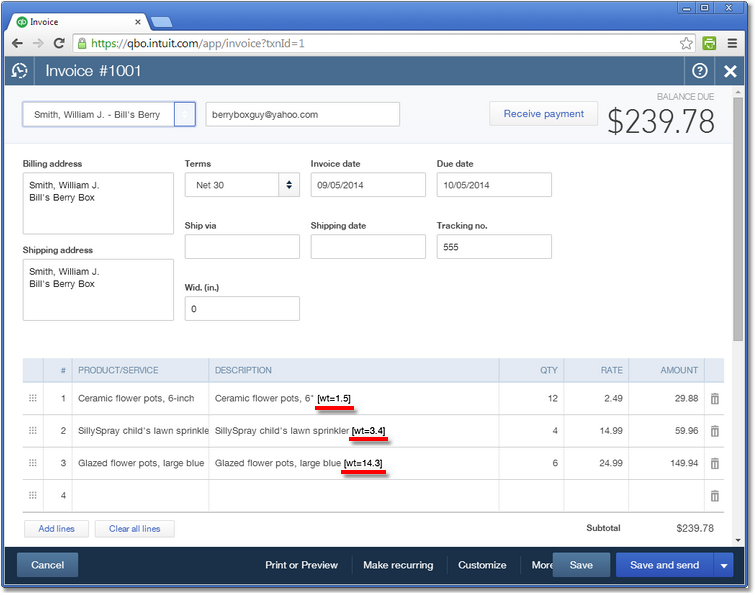
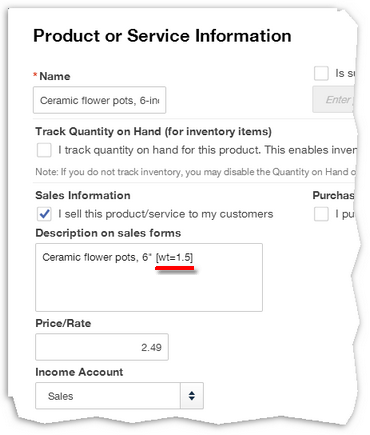
Notice the text underlined in red. That's where the per-item weights will come from. The weight information—such as [wt=1.5]—was added to the item descriptions by editing the Products and Services list in QuickBooks Online, as shown here:
This way, selecting an item on an invoice will automatically bring its weight into the invoice, in the Description column, as you saw in the invoice above.
| For details on how to store data in text fields see the GETVAL function reference topic. |
| 2. | Open the target application and enter some data |
The QuickBooks Online invoice shown above is an example of that.
| About Web browsers: FullSpeed works with most browsers but not all. Some, like Google Chrome, require specific settings. See the Web browser notes topic for details. |
| 3. | Start FullSpeed |
The first time you start FullSpeed, a new, blank file will be created for you to work in. Or, you can select File > New to start a new file.
| 4. | Choose a macro worksheet 0..9 to work with |
A FullSpeed file can have up to ten macros in it. Each is defined on a separate worksheet (the macro worksheet tabs are numbered 0..9). This example will use macro worksheet 0. To select it, click on the 0 tab at the bottom of the spreadsheet window.
Think of the columns in a FullSpeed macro worksheet as corresponding 1:1 to columns or fields in the target application. The only difference is that macro worksheets do not have to represent all columns (fields) of the target application. Only the range of columns (fields) involved in the calculation need to be represented.
Suppose a macro will read data from the 2nd column of an invoice and write results to the 5th column. In that case the worksheet would only need to have the 2nd, 3rd, 4th, and 5th columns represented. (But it's a good idea to leave a blank column or two to the left of the worksheet columns you do use, in case the target application's column layout changes.
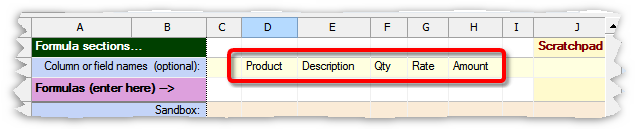
Labeling the columns is optional but is always a good idea! Adding descriptions on the Column or field names row helps you keep track of where formulas need to be entered, to match up with the target application's fields. Here we've labeled columns to match the invoice shown above:
You can enter formulas in either of two places: the Formulas row or on one of five text-triggered formula rows.
| Formulas that apply to each line of data in the target application go on the Formulas row. Formulas you want applied only to specific lines go on a text-triggered formula row. |
Calculating a total shipping weight on an invoice requires just two formulas: one on the Formulas row to calculate an extended weight on each row, and one on a text-triggered formula row to total the extended weights. Here's a macro worksheet with the formulas in place:
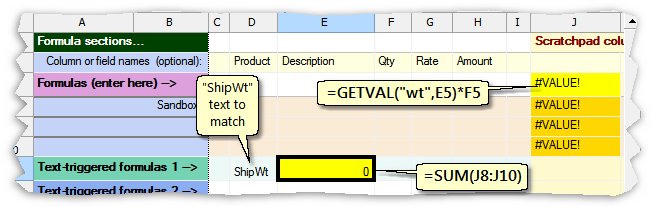
The first formula is entered in a Scratchpad column, because no spare columns are available for the extended weight calculation in QuickBooks Online. The formula will extract the item's weight from the Description field (E5) and multiply it by the quantity in the Qty field (F5), to calculate an extended weight:
=GETVAL("wt",E5)*F5
| Wait a minute! Why do the results in the Scratchpad column show #VALUE instead of numbers? The reason is that the =GETVAL function tries to extract an item weight from cell E5, but E5 has no data in it...at least not yet! |
The second formula is entered on a text-triggered formula row. We want the formula to be triggered only when FullSpeed finds the item name ShipWt in the invoice's Product/Service column. So enter ShipWt (the text to be matched) in the Product cell of the first text-triggered formula row. Then enter a formula in the Description column on that same row, to total the extended weights:
=SUM(J8:J10)
| Why does this formula refer to cells in the Sandbox? When a formula refers to the range of Sandbox cells, that tells FullSpeed to refer to "the whole column of data" when the macro actually runs. |
|
The quick way to enter a "whole column of data" cell range is to make both coordinates of the range point to row 0. You could enter the formula shown above as: =SUM(J0:J0) and FullSpeed would automatically adjust it to: =SUM(J8:J10) |

| 7. | Enter some sample data to test your formulas (optional) |
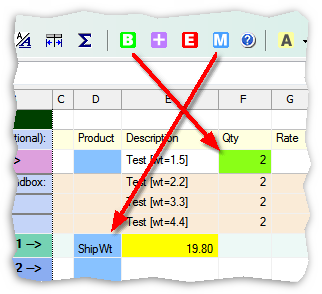
To see if your formulas work as expected you can enter sample data in cells to which the formulas refer. Here's the same worksheet after entering sample data on the Formulas row and in the Sandbox. Now the formula results look as we would expect:
The total shipping weight shown above, 19.8, looks fine. But what if one of the items had a weight of 1.03795? Then the shipping weight might have more decimal places than you want! To avoid that possibility you can format the formula's results.
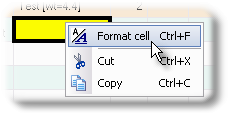
To format a formula cell, either click the Format button in the Editing toolbar or right-click the cell and choose Format from the pop-up menu:
This will open the Format data or results window, where you can choose formatting options.
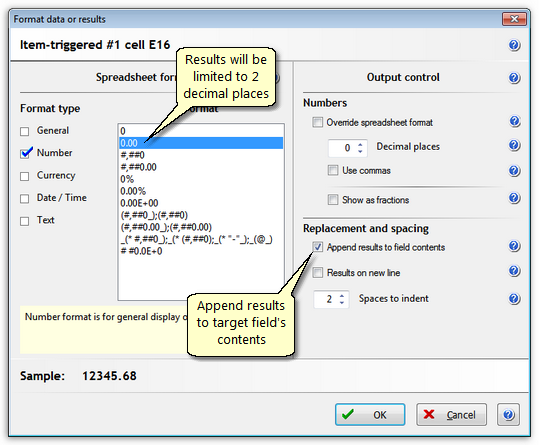
The formatting options selected in this screenshot will (1) limit the shipping weight total to two decimal places, and (2) cause it to be appended to the target application field's contents—i.e., added to the end of whatever is in the Description field.
| See the Formatting results (and sample data) topic for more information. |
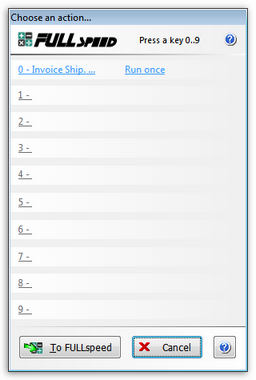
Choose appropriate options for running the macro...
Macro options toolbar settings

Notes:
| ® | The target application is QuickBooks Online. It is very important to select the correct target application. If you don't, your macros probably will not work. |
| ® | The Run once repeat type is selected, which is the best choice when testing a new macro, because it will only run the macro one time. |
| ® | Ctrl+0 is the hotkey assigned to this macro. We will use this hotkey to run the macro in QuickBooks Online. |
Mark the "mapping" cells
You need to "map" the worksheet's cells to the target application's fields, by selecting a Begin field and—because the macro needs to match the ShipWt text in a column of the QuickBooks Online invoice—a Match column.
| ® | To mark the Begin field click in the Qty cell, then click the green |
| ® | To mark the Match column click in the ShipWt cell (or any cell in that column), then click the blue |
| 10. | Save the macro file...often! |
FullSpeed does not automatically save the macro file, so you need to save it by using the Save button in the main toolbar or by selecting File > Save from the main menu.

| It's a good idea to use the Run once repeat type when testing a macro for the first time. |
| 1. | Go to the target application (QuickBooks Online in this case). |
If it is already open in your Web browser, just go to the QuickBooks Online tab in the browser.
| 2. | Enter some sample data. The QuickBooks Online invoice shown earlier still needs a ShipWt item to trigger the shipping weight calculation, so let's add it: |
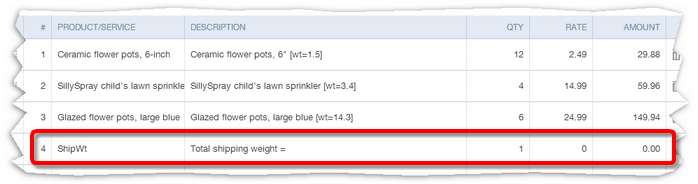
| The Rate (price) on the ShipWt item line is zero, so it won't record any income. |
| 3. | Click in the Begin field before running the macro. Qty was selected as the Begin field in step 9, so click in the the Qty field on the first row of the invoice. |

| 4. | Press the macro's hotkey, Ctrl+0 in this example. |
The focus will move among fields on the first row of the invoice, but nothing else will seem to happen. Why? Because the only calculations that were done happened in the FullSpeed Scratchpad...and Scratchpad results are not written to the target application. But we can view the calculations on the Workspace tab.
Checking results in the Workspace tab
| 1. | Go to FullSpeed. |
If it is already running, click its icon in the Windows taskbar.
| 2. | Click on the Workspace tab at the bottom of the window. |
Here's a view of the Workspace tab's worksheet, with columns resized for easy viewing.

The macro worked as it should have. Using the Run once repeat type, we only allowed it to process one row of the invoice. The total shipping weight won't be calculated until the macro gets to process the entire invoice, which we will do next.
| The Workspace tab always contains data and results from the most recent macro run, which makes it handy for debugging formulas or verifying calculations. |
Switch to the Run until "X" blank fields repeat type, then test the macro again. (Run until "X" blank fields means the macro will process all lines of data in the target application, only stopping when it runs out of data or encounters too many blank rows.)
You can change the repeat type in either of two places:
| ® | In the macro options toolbar, or |
| ® | In the Action dialog. |
Lets use the Action dialog this time, so you can see how it works.
Using the Action dialog
The Action dialog lets you do two things: (1) change a macro's repeat type, and (2) run a macro:
| 1. | Switch to QuickBooks Online. |
| 2. | Click in the Begin field again—the Qty field on the first row, just as you did in step 11. |
| 3. | Press the Action dialog hotkey, which is Shift+Ctrl+F12 unless you've changed it (in the Options dialog). |
The Action dialog will pop up:
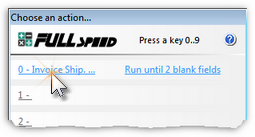
This dialog shows all of the macros you have defined (just one in this example) along with their repeat types. From here you can change any repeat type or run any macro in the list.
| 4. | Click the Run once link on the macro 0 line. |
It will change to a drop-down list.
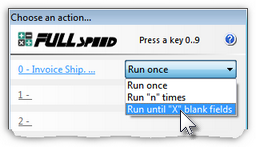
| 5. | Select the Run until "X" blank rows repeat type. |
| 6. | Run macro 0 by clicking on its link. |
The macro will run until it runs out of data rows.
| This is where the "X" blank rows setting matters. If set to 1, the macro will stop as soon as it encounters one blank row in the Match column. |
|
Another way to run a macro from the Action dialog is to press the number key matching the macro number. With the Action dialog showing, you could press the 0 key to run macro 0, the 3 key to run macro 3, etc. |
Checking the results
Here's the detail area of the QuickBooks Online invoice after the macro has run.
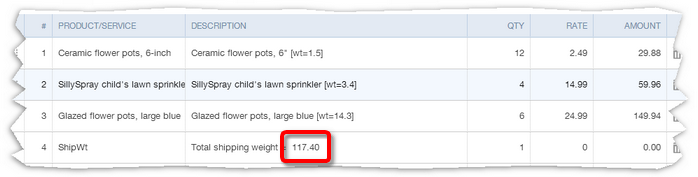
As you can see, the macro calculated a total shipping weight of 117.40 and added it to the ShipWt line.
But is this number correct? One way to find out would be to verify the results using a calculator (ugghh!). The other would be to go to the Workspace tab in FullSpeed and review the calculations.
Here's a view of the Workspace tab. You can see the Description and Qty information that was gathered from the invoice, and the extended weight that was calculated for each line:
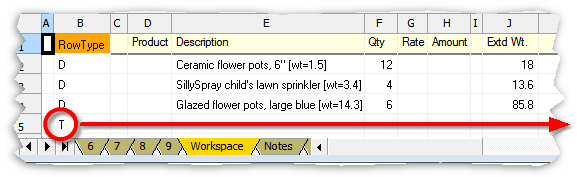
But where is the shipping weight total? The T in the RowType column stands for "text-triggered". Text-triggered formulas are always offset to the right of the D (detail) formulas (for technical reasons). Scrolling to the right and narrowing the columns a bit, we find:
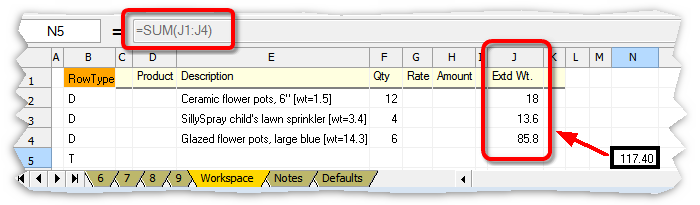
Here you can see that the formula in cell N5, =SUM(J1:J4), sums the extended weights in column J. And you can verify that the total looks correct.
What's left? Use it!
With your macro fully tested, you're ready to use it for real-world calculations. And if you need other calculations to solve other problems, you can set them up on the other available macro worksheets.