In this topic: Finding and fixing unclassified transactions in QuickBooks Finding and fixing unclassified transactions in ManagePLUS Gold |
A primary goal of activity-based costing is to fully charge all revenue and expense with the organization's various programs. Otherwise, profit and loss reports for each program may underestimate the costs of providing those programs, and distort management's view of program benefits versus delivery costs.
To capture all revenue and expense in this way, every transaction involving income or expense should be assigned a class when it is entered. But forgetting to assign a class is easy to do, so it's important to check for unclassified amounts and assign the appropriate class(es) to them.
Both QuickBooks and ManagePLUS Gold offer easy ways to find and "fix" unclassified amounts, and each has advantages:
| • | The QuickBooks approach is best when you need to evaluate unclassified transactions individually and want to assign classes directly to the original transactions. |
| • | The ManagePLUS Gold approach is best for "wholesale" assignment of an unclassified amount to a class. It is equivalent to making Journal Entries to classify unclassified amounts but is much easier—it works with drag-and-drop simplicity. |
Finding and fixing unclassified transactions in QuickBooks
| 1. | Open a Profit and Loss by Class report for the accounting period you are working with. |
| 2. | Scroll to the far right side of the report. |
If a class was not assigned to any transaction(s), a column named Unclassified will be present.
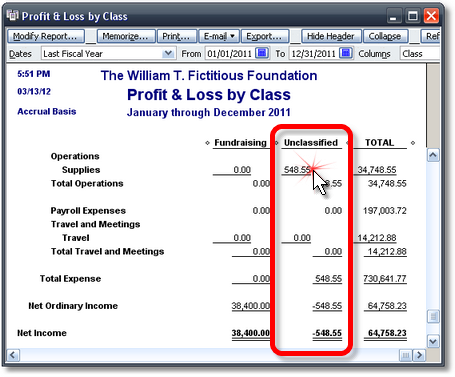
| 3. | Double-click any number in the Unclassified column to open a list of unclassified transactions for the account listed on that row. |
| Or, you can double-click the amount on the Net Income row to open a list showing all unclassified income and expense transactions. |
If we double-click the $548.55 amount on the Supplies row, a window like this will open:
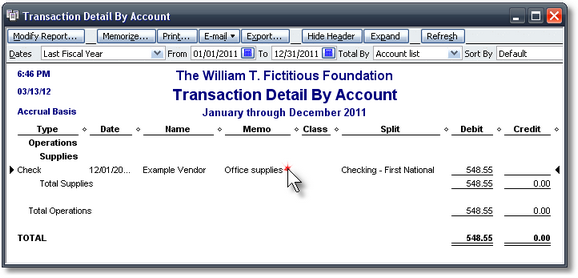
| 4. | If we double-click a transaction line as shown above, the original transaction will open and we can assign a class to it (Office & Admin in this case): |
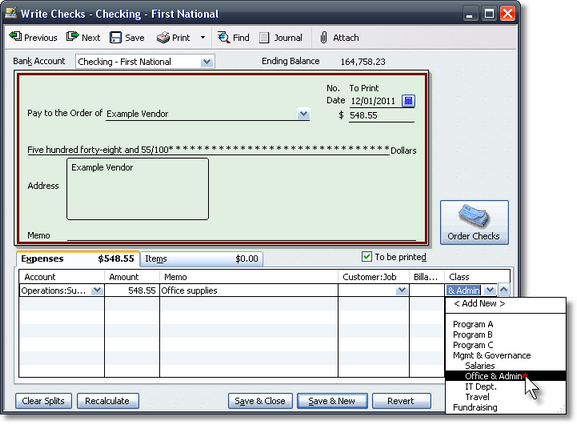
You can find and fix all unclassified amounts using these same techniques.
| Or...there's Client Data Review. If you have the QuickBooks Premier (or Enterprise) Accountant edition, its Client Data Review (CDR) feature gives you another alternative for reclassifying transactions. CDR will let you apply classes to batches of transactions if desired, which is obviously faster than classifying transactions individually. |
But CDR won't allow you to split unclassified amounts among multiple classes or change dollar amounts of existing class splits. For that you need to either (1) edit the original transactions, or (2) use Journal Entries to assign amounts to classes, or (3) use a tool like ManagePLUS Gold, as described below.
Finding and fixing unclassified transactions in ManagePLUS Gold
| 1. | Go to the Chart of Accounts window by clicking on either the Accounts button in the toolbar or on the Chart of Accounts tab if it is already open. |

| 2. | Scroll to the right in the Chart of Accounts window, until the Unallocated column is visible. |
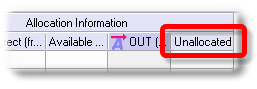
| 3. | Scroll downward, looking for numbers in red boldface in the Unallocated column...as illustrated by the blue box in the screen shot below. |
When an account has unclassified amounts, they show up in the Unallocated column. Amounts from subaccounts are totaled at the parent account level and shown there in red boldface text. This screen shot shows the same $548.55 unclassified amount for Supplies expense, as in the QuickBooks examples above.
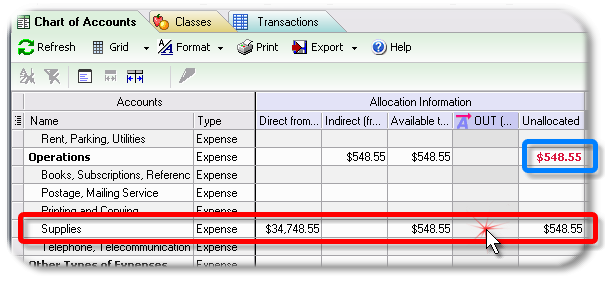
| The red boldface text is applied at the parent account level to let you know that you have the option of applying a class(es) to the entire unclassified amount directly from the parent account, rather than having to do so individually for each subaccount. |
| 4. | If we double-click the OUT (allocated to others) cell on the Supplies row, the Allocated OUT (to others) dialog will open, where we can assign the unclassified amount to a class—or split it among any number classes, if we want. |
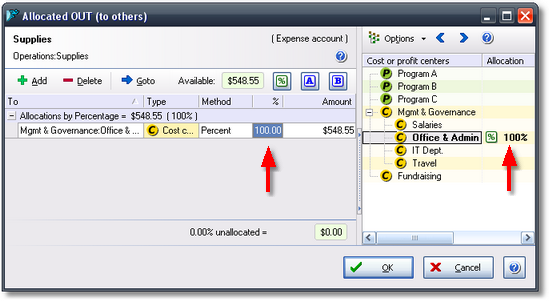
In this case we want to assign the entire amount to the Office & Admin class, just as we did in the QuickBooks example.
| 5. | We allocate 100% of it to Office & Admin, by dragging the [%] token onto Office & Admin in the right pane. |
Here's the result. As the red arrows indicate, ManagePLUS Gold has allocated 100% to Office & Admin.
| Could we have split Supplies expense among several classes? Yes. All of the same allocation methods shown earlier in the Creating allocations section are available here too. |
| 6. | Click OK to close the dialog. |
| Though we've assigned Supplies expense to the Office & Admin class here in ManagePLUS Gold, the result won't show up in QuickBooks until we send Journal Entries to QuickBooks, as described in the next section. |
|
For some expenses the easiest way to assign classes is to do so after completing the accounting period. Consider something like a utility expense—electricity for instance—which you always split among two or more classes according to a set percentage; maybe 60% to Office & Admin, and 40% to the IT Dept. Using QuickBooks' memorized transaction feature simplifies splitting the electricity bill among classes somewhat, and QuickBooks' calculator capabilities help too, but still you have to manually calculate the dollar amount of each split. Especially if you (or whoever is entering transactions) are splitting the expense among more than two classes, this both takes extra time and introduces more opportunity for errors—like mistyping the desired percentage of one of the splits. An easier way, is to simply leave electricity expense unclassified when you enter it. Then use ManagePLUS Gold at the end of the accounting period to split electricity expense among the desired classes, using the drag-and-drop approaches shown in this paper. This works well for many expense types which don't necessarily need to be classified at the time of transaction entry. It also works in those situations where you've "inherited" a set of QuickBooks records and are asked to generate some meaningful management information from them! |
