This example demonstrates:
•How to add fields to a QuickBooks form
Adding Fields to a QuickBooks Form
Often you may need to add fields to a QuickBooks form to hold data used by FormCalc SST formulas, or to hold results calculated by FormCalc SST. The details of customizing different forms differs slightly, but overall the process follows these steps:
1.Open the form you want to customize.
| In this example, we will work with the Invoice form (Customers > Create Invoices). |
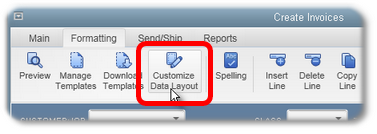
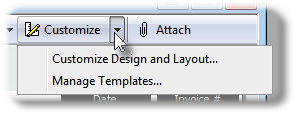
2.Click on the form's customize command.
| In QuickBooks 2014 you'll find the command in the form's menu/ribbon bar (Formatting > Customize Data Layout): |
| In older versions, the customize command or button may be in a different location, such as: |
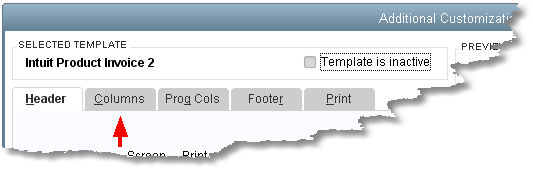
| The Additional Customization window will open. Notice the Header, Columns, and Footer tabs. These are the main tabs you'll be interested in to customize the form for use with FormCalc SST. |
Header tab |
Lets you control which fields appear in the form's header, including custom fields defined in the Customer or Vendor list (depending on whether the form is Customer-oriented or Vendor-oriented). |
Columns tab |
Lets you control which columns appear in the form's detail area, including custom fields defined in the Item list. |
Footer tab |
Lets you control which fields appear in the form's footer, including custom fields defined in the Customer or Vendor list (depending on whether the form is Customer-oriented or Vendor-oriented). |
3.Click on the tab you want to work with (Header, Columns, or Footer).
4.Select fields to include by check marking their boxes in the Screen column.
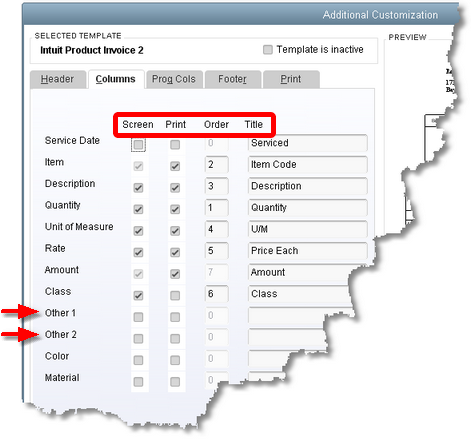
| The Other 1 and Other 2 fields are spare fields you can use for nearly any purpose. They are handy for holding data or calculation results when working with FormCalc SST on a QuickBooks form, but their contents are not available on QuickBooks reports! So when calculating something that you may want to see on a report, use custom fields instead. |
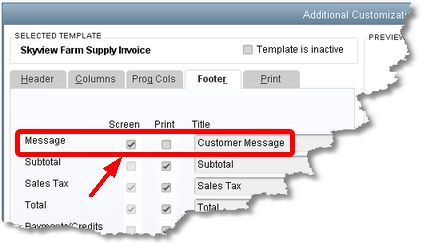
| FormCalc SST requirement: The form must have the Message field enabled on the Footer tab! (See the instructions below.) |
| The Screen column controls which fields/columns appears in the form's window in QuickBooks, while the Print column controls which appear on printed copies of the form. Often you may have fields/columns you want to include in the form's window (Screen) but which do not want to include on copies printed for your customers (Print). |
5.You may change the order of fields (in the Columns tab only) by changing column numbers in the Order column.
| For instance, if a column is at position 5 and you want it at position 3, change its number from 5 to 3. The other columns will be automatically renumbered to accommodate the change. |
6.You may rename fields by entering new names in the Title column.
7.Click OK to close the Additional Customization window.
How do I get custom fields to show on my forms?
Custom fields—the fields you can define in the Item, Customer, and Vendor lists—can also appear on QuickBooks forms. However, you have to define custom fields before they are available to include during the form customization steps described above.
| See Defining and using custom fields for details. |
You MUST Include the Customer (or Vendor) Message Field!
FormCalc SST places only one requirement on your QuickBooks forms: they must have a Customer Message (or Vendor Message) field. FormCalc SST uses that field for form navigation.
So when customizing forms, be sure to include the Message field on the Footer tab, as shown below, by checkmarking the box in the Screen column. Checkmarking the Print column box, which causes fields to show on printed copies, is optional.