This example demonstrates:
•How to auto-number the lines of a packing slip (or invoice, or sales receipt, or any other QuickBooks form)
•How to use FormCalc SST's statistical function COUNTA
Adding Line Numbers to a Packing Slip (or Invoice)
Like many companies that ship out products, Deep Blue Pool Supply prepares and prints out packing slips by applying a Packing Slip template to their QuickBooks invoices. Because the number of items being shipped can cause confusion as orders are filled, Deep Blue wants to add line numbers to their packing slips. QuickBooks has no option for doing this, but it's simple to do with FormCalc SST.
QuickBooks Setup
Add a column to the Packing Slip (or Invoice) template, to hold the line numbers
1.Open the Invoice form.
2.Apply the Packing Slip template you use, by selecting it in the invoice's Template field.

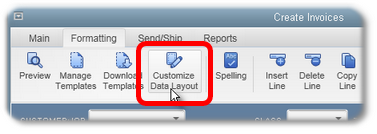
3.Click on Formatting > Customize Data Layout in the invoice form's menu/ribbon bar.
| The Additional Customization window will open. |
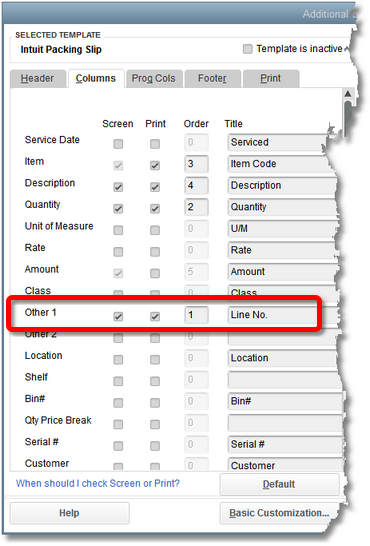
4.Click on the Columns tab.
| Now, you need an unused field you can add to the form to hold the line numbers. Other 1 and Other 2 are spare fields available for any purpose, so use Other 1 if it is available. |
| If Other 1 and Other 2 are already in use, you can add a custom field to the Items list to make an additional field available for adding to the packing slip template when you customize it, as described below. |
5.On the Other 1 line, checkmark the boxes in both the Screen and Print columns, change the field's title to Line No., and enter 1 in the Order column to make Line No. the first field on the form. (You don't have to make Line No. the first field, but that's where most people prefer to see it.)
| Also, be sure the Message field is selected on the Footer tab, even if you don't need it. The Message field is required by FormCalc SST for navigating the invoice/packing slip form. |
6.Click OK to close the Additional Customization window.
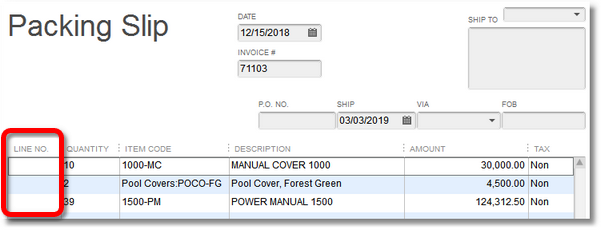
| Here's how the modified Packing Slip might look, with the added Line No. field: |
| For more customization details, see Customizing QuickBooks forms for FormCalc SST. |
FormCalc SST Setup
Take a snapshot of the Packing Slip form
FormCalc SST needs to take a snapshot of the Packing Slip (which is really an invoice with the Packing Slip template applied).
1.Don't take a snapshot of a blank packing slip! Include at least three Item lines, as shown on the form sample above. Also, enter "dummy" numbers in the Line No. column on all three lines so that FormCalc SST won't think they are blank.
2.In FormCalc SST, choose File > New from the main menu to begin a new file.
| This step assures you won't overwrite an existing FormCalc SST file. If you were taking a second snapshot of a QuickBooks form—maybe because you had modified the form since the prior snapshot—then you wouldn't need to start with a new file. |
3.Click the Action button in the main toolbar.

| The focus will switch to QuickBooks, and the Choose an action dialog will appear: |
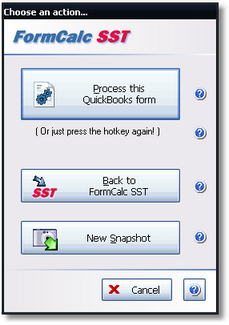
4.Click on the New Snapshot button.
| FormCalc SST will take a few seconds to gather information about the Packing Slip form, and will then display a representation of the form on the Snapshot tab. |
| If you get a "No detail lines?" message while taking the snapshot, it is because you failed to populate the Line No. column with a number on each Item line. Do that, then take the snapshot again. |
5.Indicate the column type of the Item column and the Line No. columns (at least).
| You must always indicate which column is the Item column. Beyond that, you must also identify the type for any column(s) which will have formulas in them, which in this case is just the Line No. column. Identifying the types of other column is optional but very helpful. It helps you keep track of "where you are" on the snapshot sheet, relative to the QuickBooks form's columns. |
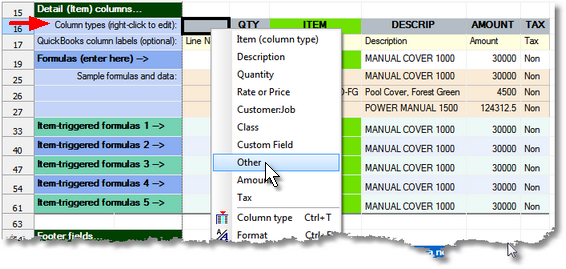
| Here's a partial view of the snapshot with column types already selected for the Item column and a few others, and the Line No. column's pop-up (right-click) menu displayed—Line No.'s column type is about to be selected as Other. |
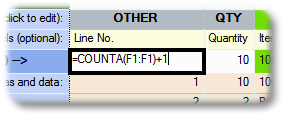
6.Enter a formula to generate the line numbers in the Line No. column.
| Enter it this way: |
| =COUNTA(F1:F1)+1 |
| This tells FormCalc SST that you want the formula to count all the non-blank cells in column F (the Item column) and add 1 to that number each time the formula calculates. The formula will calculate on every line, it will number all lines which have an Item. |
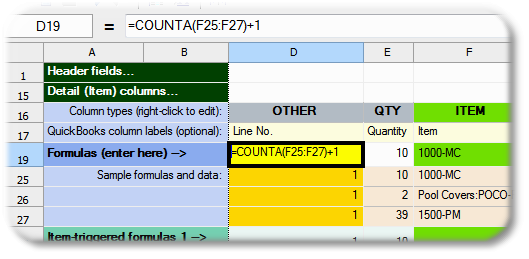
| The reference to a cell range that involves just the first row of the worksheet (F1:F1) is a shorthand way of telling FormCalc SST you want to include all rows of column F that are present at the time the formula is calculated—i.e., when the QuickBooks form is being processed. Understand that as soon as you've entered this formula FormCalc SST will convert it to a reference to the sample rows area, which is the cell range FormCalc SST uses for keeping track of references to "all rows" of any column. The adjusted formula will look like this: |
7.Click on the Save As button and supply a filename, to save the FormCalc SST file.

| FormCalc SST files are identifiable by their .SSF filename extension. |
| All of the necessary setup is completed, and FormCalc SST is ready to use for adding line numbers to QuickBooks Packing Slips. |
Processing QuickBooks Packing Slips
To process a Packing Slip in QuickBooks:
1.In QuickBooks, open the Invoice for which you want to create a Packing Slip.
2.Be sure your Packing Slip template is applied to the invoice.
| A FormCalc SST snapshot is specific to the template (field and column arrangement) that was in use when the snapshot was taken. |
| To use FormCalc SST with a different template you need to take a new snapshot, to update the FormCalc SST data file. To use FormCalc SST with several different QuickBooks forms and/or templates, you may create a different FormCalc SST data file for each. |
3.Press the FormCalc SST hotkey, which is F11 unless you have changed it in Preferences.
| The Choose an action dialog will appear: |
4.Process the form by either (1) pressing the hotkey a second time, or (2) clicking on the Process this QuickBooks form button.
| Here's a view of the form after FormCalc SST has added line numbers. |

Note that there's a blank line inserted between some of the Item lines in this example. That was to demonstrate that this approach—the formula we used—only numbers lines that have an Item name on them. As you can see, the blank line is not numbered (indicated by the red arrow).
"But I want every line numbered, including blank lines!"
If you'd prefer to have the blank lines numbered too, no problem. In fact there are a couple different ways to accomplish that.
One would be to just slightly change the formula from the example above. If you enter it this way:
| =COUNTA(D1:D1)+1 |
FormCalc SST will number every line.
If that approach doesn't make sense to you, here's an even simpler formula for the Line No. column:
| =D18+1 |
This formula simply adds 1 to the number from the row above it, thus numbering each line.