|
4. Choose an "accounting period", and refresh records |

  
|
|
4. Choose an "accounting period", and refresh records |
|
Define and choose an accounting period
To work with any set of records in ManagePLUS you must define an "accounting period" to work with. "Why? We're not doing financial accounting." No, we aren't, but ManagePLUS is designed to work with financial accounting records. It automatically stores a different set of management information for each accounting period you define, and for that reason requires that you've identified the accounting period you are working with.
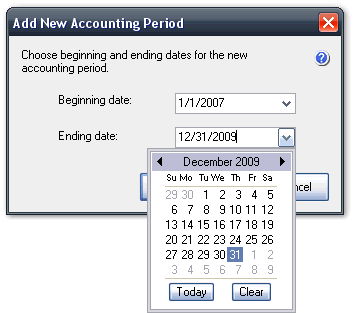
Normally you would define an accounting period for a particular month, quarter, or year. But since our Classes list identifies the crop year—thus keeping different years' data separate—we can set up a single "accounting period" that represents the entire range of transaction dates in our records, which is 1/1/2007 through 12/31/2009. That will let us analyze yields across the entire set of crop years, farm locations, fields, varieties, etc.
In ManagePLUS:
| 1. | Click on the Period button in the toolbar, or choose View > Select Active Accounting Period... in the main menu. |

| The Select Accounting Period window will open: |
| • | If its list is empty, a message will say that you need to define an accounting period...click OK to close the message. |
| • | If you have created other accounting periods before, click on the New button to define a new one. |
| The Add New Accounting Period window will open. |
| 2. | Enter beginning and ending dates for the new accounting period, then click OK to close the Add New Accounting Period window. |
| The new accounting period will appear in the Select Accounting Period window's list of accounting periods (along with any others you may define). |
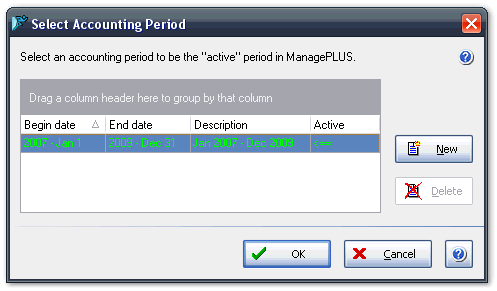
| 3. | Highlight the accounting period you want to use, as shown in the above screen shot. |
For this example it should be the period you've just now defined: 1/1/2007 through 12/31/2009.
| 4. | Click OK. |
Whichever period was highlighted when you clicked OK, will become the active accounting period in ManagePLUS.
Refresh transactions and lists
ManagePLUS maintains copies of transactions (in this case, crop records) and various lists from QuickBooks. When you try to open a window in ManagePLUS, if it hasn't yet gotten the necessary data from QuickBooks it will ask to do so.
In ManagePLUS:
| 1. | Open the Transactions window by clicking on the Trans' button in the toolbar or choosing Lists > Transactions from the main menu. |
![]()
ManagePLUS will recognize that it has no transactions for the accounting period and will ask to refresh (import) them from QuickBooks.
| 2. | Click Yes or OK to let ManagePLUS refresh transactions. |
ManagePLUS will open the Transactions to Refresh window.
| 3. | Click the All button to select all transaction months for the refresh. |
![]()
| 4. | Click OK to start the refresh. |
ManagePLUS will import a copy of transactions from QuickBooks, as well as any lists (Chart of Accounts, Classes) required for displaying transactions.
When the refresh is complete, the Transactions window will open.
![]()
| 5. | Click the Best Fit All Columns button (indicated in the screen shot above) to get a fuller view of the transaction records. |
As you can probably tell by now, these are the same records you browsed in QuickBooks. Pretty dull, huh? Well, the Transactions window will look a lot more exciting after just a few more steps.
Page url: http://www.goflagship.com/help/mp/index.html?wrk_acctgperiod.htm