|
2. Explore lists and transactions in QuickBooks |

  
|
|
2. Explore lists and transactions in QuickBooks |
|
The example company has entries in some QuickBooks lists like Accounts, Classes, and Items as well as a number of transaction entries for the actual production records. You should explore how this data in QuickBooks to understand how and where it has been entered and how QuickBooks features like the Items list have been used for entering it.
| Throughout this discussion we use the term "transactions" when talking about production record entries. Those entries aren't financial transactions, so why use that term? Well, "transactions" is the usual term for data entries in QuickBooks, so sticking with using it here should be the least confusing. If you prefer, think "records" when you see "transactions". |
In QuickBooks:
| 1. | Start QuickBooks and open the example company file as described in section 1. Open the example company in QuickBooks. |
| 2. | Open the QuickBooks lists shown below, and explore their contents. |
| Your QuickBooks windows may have a different appearance from the ones shown here, which are from a couple different QuickBooks versions. |
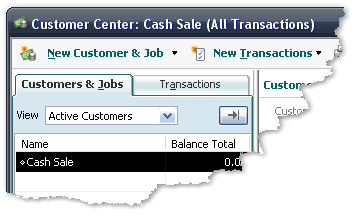
The Customers & Jobs tab of the Customer Center (Customer:Job list in older QuickBooks versions) has one customer, named "Cash Sale". Setting up at least one customer is necessary because the Sales Receipt form where records are entered requires selecting a customer name.
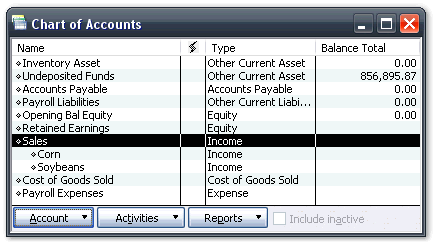
The Chart of Accounts contains mostly accounts which were automatically created by QuickBooks. We've only added the Sales:Corn and Sales:Soybeans accounts. We needed at least one Sales account to assign to the Items we set up (described below), but setting up these two Sales sub accounts is something you might do to have the production records' chart of accounts mimic the one in your financial records.
| Note: Undeposited Funds shows a large balance because we entered production records in the Sales Receipt form, which offsets its entries to Undeposited Funds. If we never enter a deposit of Undeposited Funds to a checking account (why would we? these aren't financial records), the balance in Undeposited Funds will continue to grow. |
The Item list contains one Item for each thing we're keeping production records on; in this case, corn and soybeans. They've been created as Non-inventory part items, assigned the Sales:Corn and Sales:Soybean accounts, respectively.
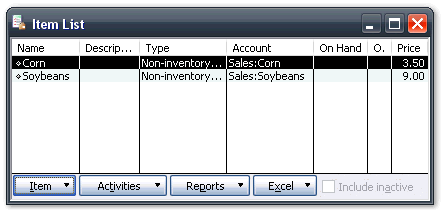
By the way, the Price assigned to each item is arbitrary. These are production records we're keeping, not financial records. Since we won't be recording any financial transactions, we won't be recording actual prices of grain sales or measuring income in any way. Having a price assigned to items may make you more comfortable with the reports you produce. But you may also assign Prices of $0.00 if you want—your reports will show "income" of $0.00, but it won't really matter.
The Class list is where all the "heavy lifting" gets done in this record system. It is structured to allow assigning these types of information to each record we enter:
Crop |
||||
|
Crop Year |
|||
|
|
Farm/Location |
||
|
|
|
Field ID |
|
|
|
|
|
Variety |
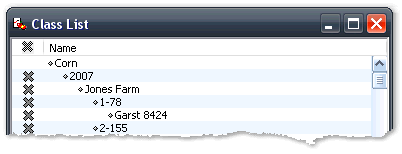
| The X's in the left column indicate prior-crop-year classes which have been marked Inactive, which reduces the amount of clutter you have to deal with when entering records for the current year in QuickBooks. |
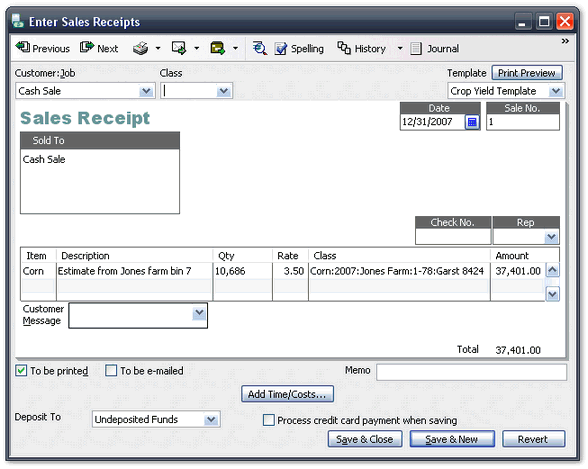
Explore entries on the Sales Receipts form
In QuickBooks:
| 1. | Start QuickBooks and open the example company file as described in section 1. Open the example company in QuickBooks. |
| 2. | Open the Sales Receipts form by choosing Customers > Enter Sales Receipts from the main menu (in most versions of QuickBooks). |
| 3. | Use the Previous and Next buttons to explore some of the Sales Receipt entries. |
The entries show how crop yield records from a variety of sources have been entered. You may enter a few or as many yield records as you want, to represent yield for a particular crop year, farm location, field ID, etc. Because there's a place to select the Class on each Sales Receipt, you can enter yields for multiple locations/years/whatever on a single Sales Receipt. Or you can enter as many separate Sales Receipts as you want. The example entries were made mostly by entering all yield records for a particular Class on one Sales Receipt, to reduce confusion.
Here's one of the example's Sales Receipt entries:
Page url: http://www.goflagship.com/help/mp/index.html?wrk_exploreinqb.htm